If I could go back and give every rider I’ve ever taught one thing that would carry them through dressage tests, trail rides, jumping courses, and even the occasional unexpected spook—it would be this: a strong, balanced seat.
Your riding position is the foundation of everything you do in the saddle. It affects your security, your horse’s movement, and how clearly you communicate. When your position is off, you might feel out of sync, like your horse isn’t listening, or worse—like you’re not quite safe.
So today, I want to break down the Balanced Seat in the way I used to teach it to my students—clearly, simply, and with practical ways to feel it in your own body. This isn’t about sitting perfectly still like a mannequin. It’s about learning to move in balance with your horse so you’re not fighting gravity—or your horse—every stride.
What Is the Balanced Seat?
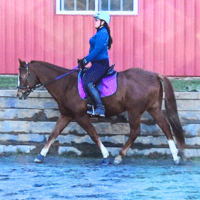
The Balanced Seat is a neutral, centered riding position used in most English disciplines. Whether you’re riding dressage, hunter/jumper, eventing, or just working on your flatwork, this position helps you ride in harmony with your horse’s movement.
At its core, a balanced seat:
- Centers your weight over the horse’s center of gravity
- Keeps you aligned so your body can absorb motion naturally
- Lets your aids be soft, quiet, and effective
This position can change slightly depending on your discipline—think of a jumper’s two-point versus a dressage rider’s deep seat—but the fundamentals remain the same.
Think of Your Position in Layers
When I taught riding lessons, I used to tell students to think of their body from the top down like building blocks. If something is out of line at the top, it affects everything beneath it. Let’s go through each piece.
1. Head and Eyes
Start by simply looking where you’re going. Keep your head upright and eyes forward—not down at your horse’s neck or the ground. It might feel odd at first, but your body tends to follow your gaze.
Looking down can pull your whole posture forward, making it harder to stay centered. Instead, pick a point ahead—like the end of the arena or a tree on a trail—and softly keep your focus there.
Teaching tip: I often had students ride straight lines and call out what they could see in front of them to keep their heads up.
2. Shoulders Back and Open
Relax your shoulders and let them roll gently back and down. You don’t want to pinch your shoulder blades together, but you also don’t want them creeping up toward your ears. Think about your collarbones widening. This keeps your chest open and your upper body aligned without tension. I used to tell riders to imagine they were wearing a cape and trying to let it hang evenly behind them.
3. Elbows Bent and Close to Your Sides
Your elbows should form a soft bend—usually around a 90-degree angle—with your upper arms close to your torso. Keep your hands steady and just above the saddle, forming a straight line from your elbow, through your forearm, down the reins to the horse’s bit.
This is called having a “direct line of contact.” It helps your horse understand your rein aids without pulling or confusing signals.
Helpful image: Think of gently carrying a tray of water in your hands. If your elbows fly out or your wrists drop, the tray tips and spills.
4. Torso Tall, Core Engaged
Sit tall through your spine with a natural, upright posture—not slumped, but not arched either. Your spine should be in a neutral position, just like if you were standing on the ground.
Engage your core muscles gently—no need to clench, but think of lifting slightly through your torso. This gives your body stability without stiffness.
A good cue is to imagine you’re balancing a small book on your head while still breathing comfortably.
5. Seat in the Deepest Part of the Saddle
Your seat should rest evenly in the center of the saddle, with your weight distributed across both seat bones. If you feel more weight on one side, or you’re tipping forward onto your pubic bone or backward onto your tailbone, adjust until you feel centered.
Quick check: At a halt, try shifting your seat slightly left, then right. Can you feel both seat bones evenly? Are you collapsing one hip?
This even seat is what allows your hips to follow the horse’s movement naturally—especially at the walk and trot.
6. Legs Hanging Long and Close
Let your legs hang down gently, draping against the horse’s sides. The inside of your thigh, knee, and calf should lie close to the saddle without pinching or gripping.
Your legs don’t hold you on—your balance does. A lot of beginners overuse their knees or clamp with their thighs, which actually pops their seat out of the saddle and makes them less secure.
Instead, think of wrapping your leg gently around your horse like a wet towel draped over a barrel.
7. Heels Down, Ankles Soft
Let your heels sink down naturally by allowing your weight to drop through your stirrups. Your ankle should act like a flexible spring—not stiff or jammed down. You want just enough drop in the heel to keep your foot stable and help absorb motion.
A locked ankle can cause tension all the way up your leg. Instead, stay loose and feel how your heel follows the horse’s movement like a shock absorber.
8. The Alignment Test: Ear–Shoulder–Hip–Heel
One of the most helpful tools I ever used with students was this alignment check. Imagine a vertical line running from your ear, down through your shoulder, hip, and heel. That’s your ideal line of balance.
If your heel is behind you or your leg is too far forward (a chair seat), your balance shifts and your aids become unclear. Realigning this line makes everything work better—your seat is deeper, your leg is more effective, and your horse can move more freely.
Common Mistakes to Watch For
Even advanced riders have to check in with their basics. Here are a few things I saw regularly as an instructor—and have been guilty of myself:
- Looking down too often (especially when nervous)
- Letting elbows drift away from the body
- Bracing in the stirrups or locking the knees
- Slumping through the lower back
- Riding with “piano hands” (palms facing down and flat)
Start by noticing, not criticizing. Then adjust one piece at a time.
Practice Tips to Build the Balanced Seat
- Ride transitions (walk-halt-walk, or walk-trot-walk) and pause after each one to reset your position.
- Drop your stirrups for a few minutes at the walk to feel your seat and lengthen your leg.
- Use mirrors or record short videos of yourself riding to check your alignment.
- Try a lunge line lesson so you can focus on position without worrying about steering or pace.
- Warm up slowly so you can tune into your body before asking your horse for more.
A Final Word from the Saddle
The Balanced Seat isn’t a “one and done.” It’s something you return to over and over. Every ride, every new horse, every new challenge—it’s the base that holds you steady and helps your horse trust you.
Riders sometimes worry that working on position means being too stiff or technical. But the opposite is true. When your body is balanced, your aids can be subtle. Your horse can move more freely. You both relax into the ride.
So don’t rush this part. Come back to it often. And celebrate the small wins—the time your leg stayed quiet over a pole, or when you felt truly in sync during a canter transition.
That’s the magic of riding. And it all starts here.
Let me know in the comments—what part of your position are you working on right now? Have any tips or visuals that helped you “click” with your seat? I’d love to hear from you.
Ride joyfully,
Kacey