How many of you want to go back to posting trot once you start learning the sitting trot? You’re not alone! Bouncing at the sitting trot is a common problem when learning how to ride horses. So don’t feel like you are the only one struggling with sitting the trot. This is something I struggled with for a long time, years even.
Over time I found some exercises that helped me learn to move with the horse instead of moving against the horse. It was what I like to call an ah-ha moment for me when I finally figured out how to sit the trot.
If you want to stop bouncing at the sitting trot, you need to stop gripping to stay on, stop tensing, or sitting there doing nothing. You need a neutral spine with an engaged core, free of tension, correct body alignment, and move your hips with the horse’s back movement. Ideally on a horse that is through and connected.
When you are first learning the sitting trot it is not going to be easy. Your hands will be doing one thing, your seat another thing and your legs yet another thing. You’re going to feel a bit all over the place.
Having an independent seat becomes more important in the sitting trot than the posting trot. Or should I say the evidence of your independent seat becomes more pronounced in the sitting trot.
Your goal is to eventually be able to move with the horse without bouncing, while in balance and have separate control over your different body parts. You want your hands, your seat and your legs to follow the horse softly so the horse will be able to relax into the rhythm of the trot and become springy and soft instead of rigid and tense.
This is essentially what having an independent seat means… control over your body, correct posture and good balance.
This is just a quick look at how you should be sitting the trot. Right now it’s just a hurdle that you need to overcome and you will be able to get there much faster if you really understand the trot, your mistakes and have the right tips, exercises and techniques that will get you to your ah-ha moment.
So let’s go into more details about these things so you can really make a difference in how you ride the trot and start moving in harmony instead of having your bum smack the saddle every other stride.
About The Movement Of The Trot & Why It’s Bouncy

The trot is a two beat gait and the horse’s legs move in diagonal pairs. That’s why when you post it is a 1-2, 1-2 rhythm. Between the time the horse switches their diagonal leg pairs there is a moment of suspension where all four of the horse’s legs are up off the ground.
Suspension is also sometimes called airtime. More suspension means the horse is higher off the ground sometimes more animated in their movement or they may have more spring in their step a.k.a impulsion. Impulsion’s power comes from the hind end.
Less suspension means the horse is lower to the ground and the horse may be more of a flat mover. Some horses like a quarter horse in a western pleasure jog or a horse in a slow trot have no suspension and just switch diagonal leg pairs with no air time. However small, there is still some up and down movement in their back just not as pronounced as a horse with more suspension.
There is lots of movement going on in the trot. Of course the up and down when the horse springs up to change diagonal leg pairs but there is also forward and back movement as the horse trots and the hind legs alternate reaching forward and back. The alternating hindleg movement also causes the horse’s back and barrel to sway side to side like in the walk.
So the horses back movement is up and down, forward and back, side to side. It’s no wonder you might be getting a bit jostled around if you don’t know how to move as one with the horse.
There are also other factors that affect how much bounce the trot has.
- If the horse is round, lifting the back and engaging the hind legs then you will feel like the trot is more floaty, springy, supple, and fluid.
- If the horse braces, stiffens up and is hollow in the back trying to protect themselves, then you will feel like the trot is very choppy, jarring, bouncy, and uncomfortable.
- The way the horse is put together conformation wise will be a factor in how smooth a horse will be. Sloping shoulders usually contribute to a smoother horse, longer pasterns. Short upright pasterns and an upright shoulder are common signs the horse will not be a smooth ride.
- The horse’s speed can affect the bounce of the trot. A slower trot will have less energy and bounce than a forward, springy trot.
- The footing will affect the trot. Harder footing creates more concussion and more choppiness, whereas softer footing will absorb more shock. However you don’t want footing too hard or too soft, instead somewhere in the middle and ideally dependent on the discipline, you are riding.
- The horse can have blocks or tension in certain parts of their body which keep them from moving freely forward and relaxed which can make a trot harder to sit to.
- If the horse is stiff that can cause a trot to feel more rigid, choppy or irregular. A horse that has arthritis or stiffness may need more time in the warmup routine to really loosen up the joints and muscles before doing the sitting trot. Always have the vet evaluate a horse if you think there could be a health condition or injury to prevent further damage or to get the best course of action.
5 Benefits Of Improving The Sitting Trot
Though you may find that the posting trot feels easier for you than the sitting trot, there are benefits to sitting the trot once you are able to do it well.
It is easier for the horse to come off the forehand.
In the sitting trot you will be sitting upright over the horse’s center of gravity, but that is not exactly what gets the horse off the forehand. Now when you lean forward slightly at the posting trot this will not be the cause of the horse to go onto the forehand.
“… if you don’t have your seat in the saddle your seat muscle actions will have little effect on bringing the horse off his forehand. Thus, you only become effective at bringing the horse off the forehand when your seat muscles are correctly in the saddle.”
-Equineindaba.com
So sitting trot gives you the opportunity to use all your aids correctly and effectively get the horse off the forehand more easily than the posting trot. The goal is you want the horse light on the forehand and carrying more of their weight on the hindquarters.
The horse is more balanced with less interference in their movement.
While posting the trot your weight is constantly changing and moving around. If you are not steady and balanced, landing softly and carefully, this can be uncomfortable on the horses back. The constant change of weight placement can disrupt the horse’s movement, posture, and balance.
You are able to communicate to the horse more clearly with your riding aids.
This is partly going back to number 1. In the posting trot you are not able to have full control of the aids. When you rise out of the saddle you can’t effectively apply a half halt or use your seat to communicate.
Most riders find it difficult to apply leg aids on the up phase of posting. Your right leg controls the right hind leg and your left leg controls the horse’s left hind leg as each leg comes off the ground. Timing is important. When you rise in the trot your inside leg would apply to communicate to the horse’s inside hind coming off the ground. And at that time you can’t apply your seat aids in conjunction with it.
Sitting trot is also essential to applying the correct aids for lateral work. Lateral work consists of different movements that have the horse moving sideways and part of the aids for lateral work are the seat aids.
It is easier to get a horse round, connected, lifting there back, engaging the hindquarters or commonly known as “on the bit”.
The seat can really be an influential player on getting the horse to reach further under with the hind legs and to lift the back. In the posting trot I think it can be a little bit harder because you are losing that connection every other stride. Not that it is not possible to get a horse connected in the posting trot, but it is easier and more effective in the sitting trot.
Your trot canter transitions will become smoother and more harmonious.
There is nothing more jarring than coming down from a canter into a big bouncy trot or running discombobulated into the canter. Unless you are blessed to be on a smooth moving horse.
Part, not all… but part of the reason the horse races in the trot is because you are unbalanced and bouncing on the horses back. The horse becomes hollow to protect their back and then, unbalanced and on the forehand, like they are running faster and faster down a hill.
Many horses try to run away from discomfort, as a part of their instincts to flee threats and that includes smacking your butt against their back.
If you can improve your sitting trot the horse will be able to relax more easily and your transitions into the canter and out of the canter will be a lot smoother and more comfortable for you and the horse.
Tips & Mounted Exercises To Improve Your Sitting Trot And Stop Bouncing
It can be frustrating when you tell your body to do something and then your body is not able to do it. But just know your sitting trot won’t get better unless you practice it!
And you need to practice in ways that will help you. If you keep practicing by doing the same thing that’s not working then no matter how much you practice you will have the same problem.
So let’s get your sitting trot moving in the right direction. Some of these are tips, some are visualizations you can imagine, and think about while riding and some are actual exercises you can test out.
Properly Fitted And Placed Saddle
Make sure the saddle is properly fitted, in the right spot, and balanced on the horse’s back. An improperly placed or fitted saddle can cause pain for the horse and interfere with the horse’s shoulder and back movement. The horse will move freely and more comfortably when there isn’t a saddle issue.
Neutral Spine And Engaged Core
Ride with a neutral spine and with an activated core to protect your back. You should be feeling like you are getting an ab workout. Think of your core as your strong stabilizer, your anchor, your abs and your lower back are secure. Yet your bum is relaxed, your hip joints are supple, mobile, shock-absorbing, free to open and close with the movement of the horse. Your knees and ankles are soft and able to take up the movement. Your shoulders are wide open and relaxing down. Your neck is soft.
Imagine Unlocking Your Seat
Think of your seat as being locked and rigid. Then imagine you unlock your seat and it is free. Super loose and almost wild. Your seat really wants to move with the horse and is very supple.
Imagine You Seat Moving Twice As Fast
Post the trot for a bit and then when you go to do the sitting trot imagine plugging your seat bones into the saddle and moving your seat in double time to the posting trot.
Move Your Seat In A Backwards Circular Motion Every Stride
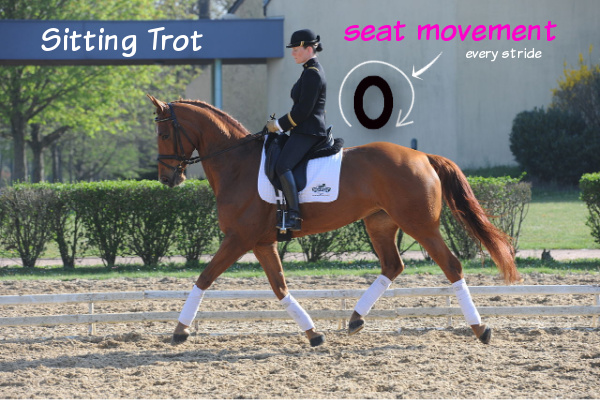
Move your hips in a quick backward circular motion almost like an upright egg shape in time with each stride of the horse’s trot. It’s almost like how you would sit in the canter, but much faster rotation and a bit more up and down.
Imagine Your Bouncing On a Yoga Ball
Think of bouncing with the horse like you’re sitting and bouncing on a yoga ball. Make sure you are in sync with the horse’s strides and with your seat bones staying connected to the horses back.
Move Your Seat In Backwards Circular Motion Alternating Your Hips Every Stride
If you want to move even better with the horse then do backwards windmills with your seat bones or think of pedaling backwards with your hips. Think of when you have your arms out straight then make big alternating backward circles with your arms. That’s what I mean by windmills. Except do it with your seat bones. It will take some time to get the right timing. You want to match up and connect your seat bones with the horse’s hind leg movement. For example: the horse’s right hind comes off the ground and forward, your right seat bone does the backwards circle. Then when the left hind comes forward your left seat bone does the backwards circle.
Visualization Exercise To Release Tension
Release tension, go through your body parts, and become aware of areas you feel tense. Think of softening those areas one at a time, but keeping your core strong. You could start at your feet and work your way up or you could start with your head work your way down, or where you feel the tensest. You might re-tense after going through all the different areas. So just begin again as if releasing tension in a cycle.
Deep Breathing Exercise
Try focusing on your breathing and soften your gaze. Work on breathing deeply and rhythmically. You want to breathe so that you are not holding your breath and you are getting enough oxygen. Make sure you don’t breathe too fast where you may hyperventilate. You could try breathing in for 3 sec and breathing out for 3 sec. But find the number that works best for you. Don’t be afraid to experiment a little bit. When you breathe out imagine the air traveling down through your center, down your legs and out your heels.
Beginners Trot Slow
It’s often easier when you’re new to riding and learning the sitting trot if you ride the horse at a slower pace than your working trot or normal posting trot speed. This is because the faster the horse goes the faster you need to move your seat. Going slower makes it easier to sync up your hips with the horse’s movement. Once you get comfortable with the slower sitting trot and can do it well, you can slowly increase the speed. Until you can confidently sit the trot at a normal working pace.
More Experienced Riders Connect The Horse For The Sitting Trot
Looking at the previous tip. That only applies for beginner riders and riders that have aren’t yet able to get their horse round and connected. You still can slow your horse a little bit but if you slow your horse too much the horse can lose the connection, impulsion, and roundness. You want free-flowing movement with the horses back lifting, springy, and better able to absorb shock. If you can produce a good quality trot posting first and then try sitting, that is more ideal than just trotting slowly, with the hind legs dragging, and the horse’s back lowered tighter and more rigid.
Put Your Focus On The Beat Of The Trot and Not On Sitting The Trot
Focus more on moving with the beat of the sitting trot than of actually sitting the trot. This is because once you are moving with the rhythm you will be sitting the trot.
Build Awareness And Practice Hip Movement At The Walk
Before you do the sitting trot, work on moving with the horse at the walk. Become aware when each of the horse’s hind legs are coming off the ground and reaching forward. If you can have someone tell you when each hindleg comes off the ground. Such as, “right, left, right. Left.” This will help you develop a feel of the hind leg movement faster than by yourself. When you trot your hip movement is somewhat similar to the walk except faster.
Quality Over Quantity
Quality over quantity. Practice the sitting trot a little bit at a time. You want to make sure you only trot as long as you can keep the quality. There are two exercises that can help you practice sitting trot incrementally. Walk-sitting trot transitions as well as posting trot-sitting trot transitions.
Walk-sitting trot transitions:
- You start out with a forward walk that feels like the horse is marching.
- Pick up the sitting trot for a few strides.
- When the sitting trot starts to degrade, come back to a walk.
- Pick up the sitting trot again.
- And repeat the process, until you can sit the trot for a few more extra strides before you have to walk.
- Eventually, you will be able to sit the trot longer and longer, until you don’t need to come down to the walk, except for working on transitions or to give the horse a break.
Posting trot-sitting trot transitions:
Similar to the above exercise.
- Start out in a posting trot and get the horse moving nicely.
- Sit the trot for a couple strides and go back to posting trot.
- When you reorganize, sit the trot a couple of strides and add a couple more strides if it is going well. If you’re falling apart, go back to posting trot.
- Repeat this process and try to sit the trot longer and longer as long as the trot quality is there.
Exercises On The Lunge Line
In the next few exercises, you may want to go on the lunge line unless you are a more stable rider with soft hands. Have your instructor or an experienced horse person lunge you and also make sure the horse is experienced and comfortable with lunging.
Being on the lunge line allows you to hold the pommel of the saddle(pulling up not pushing down) while doing these exercises which can give you extra stability when you are just learning.
You can do these exercises with or without stirrups but will get more benefits without stirrups.
Legs Away Exercise
Legs away is a great exercise if you get tension in your legs or you have a tendency to grip.
- Pick up the sitting trot
- When you begin to feel your legs tense or grip, throw your legs out sideways away from the horse so both your legs come off the saddle. (careful not to accidentally kick the horse.)
- Your legs immediately come back down to the horse’s sides.
- Keep doing this anytime the tension or gripping comes back.
This is a good exercise to release tension and to become aware of the tension you have in your legs.
Bicycle Legs Exercise
Bicycle legs is a great exercise to learn how to move your seat with the horse. You will alternate lifting your legs up and off the saddle.
Do this turning your knee out and up.
When one leg comes up the other leg goes down, similar to pedaling on a bicycle.
But that’s not the end of it. In order for this exercise to be really useful, your legs need to be in-sync with the horse’s hind legs.
This is basically an exaggerated version of the windmill or pedaling exercise with your seat bones because you are involving your legs.
Don’t worry about lifting your legs as high as possible, matching your legs with the horse’s hind legs and keeping the rhythm is more important.
If you glance at the horse’s shoulders that can help you sync up with the horse. The shoulder that is moving forward is connected to the opposite hind leg that is coming forward at the same time.
For example, the horse’s right shoulder is moving forward so your left leg lifts up and off the saddle in time with it. The horse’s left shoulder comes forward and your right leg lifts up and off the saddle.
So you can use the horse’s shoulders like this if you are unable to feel and identify the hind leg movement. Just make sure once you get the rhythm you stop looking down.
Frog Legs Exercise
Frog legs is a great exercise if you tend to grip, if you lean too far forward, if you need to find your seat bones, if you need to sit deeper in the saddle, and it is a killer ab workout.
- Sit the trot.
- Lift both legs up off the saddle with a bend in your knee.
- Hold this for as long as you can and release the position.
- Repeat as long as practicing exercise.
If you get cramps in your hips come down to a walk, take your feet out of the stirrups and put the cramp leg/legs over the saddle flaps if you are in an english saddle. This should help the cramp to go away.
If cramping continues to happen during this exercise it is an indicator you are really tight in your hips and would benefit from hip stretches.
Exercises You Can Do Off The Horse To Improve Your Sitting Trot
Soft Hands Yoga Ball Exercise
Find rope or use reins and tie it to something solid so you can simulate holding the reins riding while on the Yoga ball. Your goal will be to keep your hands steady in the same spot while you bounce on the Yoga ball.
Neutral Spine Against Wall
Find your neutral spine by lining up against a wall. Heels against the wall, butt, shoulders, and back of your head against the wall. Then try to bring your lower back to the wall. You will find that you engage your core and your back becomes a lot flatter. It is okay if you can’t get your lower back all the way to the wall especially if you. Practice holding this position and getting used to how it feels. You can also lie on the ground and pull your lower back to the ground. If you have a curvy bottom, don’t feel bad if you still have a big space between your lower back and the wall or floor, there’s not too much you can do. What matters is that your back is significantly straighter and stabilized with your core engaged.
Neutral Spine Bouncing Yoga Ball
Once you get a good idea of the neutral spine feeling and keeping it. Try sitting on a yoga ball with a neutral spine and then keeping it while bouncing. You may find you are tensing your whole body trying to keep your spine in a neutral position. Focus on relaxing the other areas of your body and releasing the tension.
Build Your Core Strength
Sitting trot is a workout and the main muscles being worked are your core. You need to be fit to ride the sitting trot really well. So it helps to do some core conditioning in your off time. Planks and pilates are great for the core. There are even some plank challenges I have seen on Pinterest you can try, to help build your core strength.
Practice Neutral Spine And Active Core Throughout Your Day
While you are walking around in your house, outside, bringing the baby for a walk, doing barn work, sitting at a desk, work on straightening your spine and activating your core. The more you can add it to your daily routine even sporadically the easier, stronger and better posture you will get.
Practice Moving Your Hips In A Standing Position
This will sort of be like belly dancing. Put your feet shoulder-width apart, with your toes pointing straight ahead and bend your knees so you are in a position similar to your riding position. Practice the movements for the sitting trot. You can start with the backward rotations shaped like an upright egg. Then after you warmed up with that try alternating backward rotations with your hips as if you’re pedaling backward. Work on keeping your core engaged, your spine in a neutral position, and releasing tension from your body everywhere else.
Practice Moving Your hips Bouncing On A Yoga Ball.
This is the same thing as the previous exercise, but add rhythmic bounces to the ball. Core activated and spine in a neutral position. Start with the backward circles and then the alternating backward circles with your seat bones/hips.
Bounce On A Yoga Ball To Music
Bounce on a yoga ball to music with trot bpm between 75 and 90 bpm. This exercise is to get an idea off the horse how fast you need to move your hips to the beat and also will help you practice keeping a rhythm. Check out this site called equimusic that has music and the bpm numbers.
“The purpose of equimusic.com is to help riders find music that makes their horse look like he/she is “dancing” to the music. It is a database of music selected to work for the walk, trot, canter, passage/piaffe.”
equimusic
Hip Stretches
If you are tight in your hips that is going to be one more thing that makes the sitting trot harder for you. Strive to do hip stretches at least a few times a week, but daily is ideal. Nicola from Dressage Rider Training has a post with 6 great hip exercises.
I am thinking about testing her hip routine for a week and recording my progress start to finish and basically creating a before and after video to see how much it helps.
12 Mistakes You Make At The Sitting Trot That Cause Bouncing
There are certain things that you might be doing that will cause you to bounce at the sitting trot. It’s good to be aware of these mistakes because how can you stop making them when you don’t know what they are.
Mistake 1: Using the reins to help balance yourself.
This is a big no no! This mistake is more toward those of you who are newbie riders. Using the reins doesn’t necessarily cause bouncing but if you are a brand new rider and you lose your balance while bouncing around at the sitting trot, some of you may find yourself grabbing the reins to try to stay on. This is more of a protective instinct that you have.
But it is not okay to do. The reins are typically attached to a metal bit in the horse’s mouth. When you grab the reins to keep your balance. You are jabbing and yanking on the horse’s mouth, where there are sensitive nerves. The reins should always be used smoothly and not harshly.
Also doing this will cause the horse to raise their head and hollow (sink down in their back.) They may try to run away from the pain or break into a walk. In any case if the horse keeps trotting while you’re hanging on the reins it won’t be comfortable for you or the horse.
Fix: If you feel yourself losing your balance and are about to pull on the reins, open your fingers and let the reins slide through so you don’t yank on the horse’s mouth. Consider adding a grab strap to the saddle if you are riding english.
If the horse is still responsive with long reins then you can try longer reins and grab the pommel of the saddle if you lose your balance. Western riding you can grab the horn of the saddle.
Either way, just make sure you stay tall and don’t let your body curl forward. Practice the soft hands’ yoga ball exercise.
Mistake 2: The number one reason for bouncing in the saddle is from gripping with your legs.
There are a few reasons why you might be gripping with your legs.
- When you’re learning something new it’s common to grip without realizing because of tension while your trying to get it right.
- You might grip because you’re trying to stay on and are afraid of falling off and getting hurt.
- You might grip because your body is out of alignment from the ideal balanced riding position and are compensating for imbalances.
Gripping is the enemy; it does not help you or the horse.
When you grip you are creating tension in your hips. Your hips need to move freely with the horse’s motion.
When you grip, your legs will lift slightly while you’re in the saddle and this can cause your feet to move around in the stirrups. You may even end up having one or both of your feet come out of the stirrups.
When you grip you inhibit free flowing movement from the horse. The horse feels when you tighten your grip and with no release it’s uncomfortable for them. They may hollow their back, slow down or speed up. All as ways to try to get away from the pressure they are feeling from your grip.
Fix: Try several of the exercises I mentioned before.
- Legs Away
- Frog Legs
- Bicycle Legs
- Releasing Tension
- Soft Hands Yoga Ball Exercise
- Practice the off horse exercises as well.
Mistake 3: You lean too far forward or back in the saddle.
When you lean too far forward or too back in the saddle:
You will have a more difficult time moving your hips with the horse’s movement.
You will have excess tension in your body.
You will be more apt to grip to compensate for your unbalanced position.
Leaning back puts you into a sort of driving position, so you are constantly driving your horse. It also puts you in a position where you are getting left behind the motion and you will be more apt to pull on the reins when you get left behind.
Leaning forward makes moving with the sitting trot even harder than leaning too far back.
Also if you have a sensitive horse they may become more speedy if you lean forward in the sitting trot. This is because it tends to cause your lower legs to slide back to the more sensitive area on the horse’s barrel or sides and to compensate you will most likely tighten your legs to try to counteract the feeling of falling forward.
But it’s a bad solution. It’s bad for you because it impairs your effectiveness, stretches ligaments around your spine, causes pain, and can set you up for chronic degenerative back problems. It’s bad for your horse because it interferes with his balance and movement. And it’s bad for doing dressage because it diminishes control, communication, and effectiveness and encourages your horse to maintain an extension pattern as well. (In him, it’s what we call “going on the forehand.”)
Fix: In the posting trot, lean really far forward and slowly lean really far back. You are exaggerating the forward and back.
Then going back and forth from leaning too far forward and too far back, slowly make the forward and back less and less, until you feel the most balanced upright position. Frog legs and bicycle legs can be a good exercise for you to try as well as the unmounted exercises.
Mistake 4: Your back is too hunched or too arched.
There shouldn’t be a pronounced arch in your back nor should your back be rolled or hunched.
If you carry yourself one of these ways you will be limited in the range of motion your hips will have. This will make it more difficult to move with the motion of the horse. You need mobility and flexibility in your hips.
You want to be in a neutral position which your core must be engaged to do. Your lower back should flatten and you should be upright. This will protect your back and allow your hips to move more freely. You want to absorb the shock in your hips not your back which can cause soreness and possibly injury.
Fix: Work on the neutral spine exercises.
If you roll your shoulder’s forward and hunch your back, think of opening your shoulders and making a smile with your collar bones. Just make sure that you keep a neutral spine with navel in so you don’t get too much of an arch in your back.
If you tend to have an arch in your back I was once told to imagine yourself as an Oompa Loompa from Charlie And The Chocolate Factory. Or you can also try thinking of your belly button going in toward your spine.
Mistake 5: Pinching your knees.
When you pinch your knees you will no longer be stable.
It will cause a ripple effect, loose lower legs, rising up out of the saddle, losing your balance, and shock rising through your body all the way to your head, creating the iconic bobble head look.
You don’t want to pinch with your knees, grips with your legs, or let your leg muscles go limp. Your legs should be toned enough that they are not flopping around, they are flexed but supple and moving along with the horse. Keep in mind that your hips, knees, and ankles should be soft and absorbing the shock as well.
Fix: Legs away, bicycle legs, frog legs, the unmounted exercises and the transition exercises should help.
Mistake 6: Locking elbows or your arms.
In an effort to keep your hands still, you may find yourself getting rigid in your arms and your shoulders. This can also happen because you are nervous and tense. Many times when people are stressed or nervous they carry tension in their neck, shoulders, and arms. This can also happen when you are trying too hard to keep your hands still.
The funny thing is many times the more you try to force your hands to stay still the more they move around. You need to keep enough tension to hold your upper body in the tall neutral position but release all the excess tightness in your neck, shoulders, arms and hands.
Fix: Try squeezing your arm muscles tight and totally letting go of the tension. Do this several times to release the tension. Imagine that your elbows are hinges and shock absorbers, your elbows can move a lot like jello but your hands are steady.
Your hands should feel the horse’s head movement and follow them to keep the pressure light, steady, and the same, except for when signaling to the horse. Try the soft hands’ yoga ball exercise.
Mistake 7: Trying hard to hold your riding position.
This is similar to locking your elbows and arms. You have too much tightness and tension trying to hold the position that you are not allowing your body to be loose and relaxed enough to move with the horse’s movement.
It’s like a dance between allowing enough tension to hold position and also allowing enough relaxation to be flexible enough to move with the horse.
Fix: Do the releasing tension in your body exercise. The breathing exercise. Legs away exercise. The walk-trot exercise. The unmounted exercises.
Mistake 8: Not breathing.
You may be holding your breath and not even know it. Holding your breath creates tension throughout your body. To help relax, focus on breathing deep and rhythmically.
Fix: Go back and look at the breathing exercise.
Mistake 9: Totally letting go of your body like Jello.
When you totally let your body go you will be like a sack of potatoes. You will not be moving with the horse, nor will you be able to keep your balanced riding position.
This will make it more difficult for the horse to carry you. Instead of just your hips and pelvis taking up the movement your whole body will end up moving around.
Fix: Work on the exercises for core engagement and neutral spine. Try the exercises for moving your hips with the horse.
Mistake 10: Jamming your heels down.
When you force your heels down you are basically bracing. This causes your lower leg to slide forward. It takes away your shock absorption in your leg joints and it causes your ankle and leg to tighten and stiffen up.
You want your heel weighted down but not forced down.
Fix: Keep your feet light and imagine your heels are soft and springy.
Mistake 11: Not in sync with the up and down motion of the sitting trot.
Your hips will be moving up and down in the sitting trot like the posting trot but twice as fast, because the horse’s back is moving up and down. Of course there is also the forward and back, side to side movement as well. But for now we are talking about the up and down.
If you are not moving your hips with the timing of the horses up and down motion you will bounce against the horses movement instead of with the horses movement. You need to time your hip movement with the horse’s movement.
You bounce because you get “out of sync” with the up-and-down movement of the horse’s back.
Fix: Bicycle exercise, hip movement exercises, unmounted exercises, especially the bouncing to music exercise.
Mistake 12: Riding the horse disconnected.
If you don’t know how to get a horse connected, then this will be something you will learn further along in your riding journey and that is okay. When I say connected I mean the way the horse is carrying themselves, and their responsiveness to the aids. Also known as on the bit, round, engaged.
When the horse is disconnected, the back is usually tight, the movement more rigid and blocked. So if you are able to get the horse connected, the back will lift, become softer and springier, and more comfortable to sit the trot to.
Fix: Side reins on trained horses while on the lunge line can help the horse to connect with enough forward rhythmic movement. The trot will become more supple and easier to sit. The rider must stay balanced, soft in the posting trot, and not slamming on the horses back for the horse to release the tension in their back.
If you can get the horse on the bit, take the time to warm up, get a forward responsive mindset, momentum, as well as into a steady rhythm. Work on getting the horse loose supple and connected and once the horse is there, then begin the sitting trot work.
Cheers, Kacey
Thank you for your excellent guide on how to sit the trot!
Do you have a guide on the two-point or jumping position?
I tried a search on your website but nothing came up.
Please advise,
Jasper B.
Williamsville, NY
Hi Jasper, I’m happy that you found the sitting trot guide helpful. Thanks for your comment! I don’t have a guide on two-point right now but that is a future blog post I plan to write! If you join the mailing list then you will get an email at least once a month up to once a week with new blog posts. Here are some tips though in the meantime for your two-point, also called jumping position, light seat, and half seat. Just like the points for the balanced riding position where you want an invisible straight line from your ear to shoulder to hip joint to ankle. For the jumping position, you want an invisible line from your shoulder over your knees over the stirrups. Your ears will be over your shoulders or just a little in front. If you look down you shouldn’t be able to see your toes in front of your knees. When you go from sitting position to jumping position think of sliding your seat toward the back of the saddle and folding your upper body down slightly with your seat bones being the pivotal point and back straight not too arched or too hunched. Your weight goes from your seat into your thighs and your heels and you should only hover your seat out of the saddle instead of being high out of the saddle with your seat like you are standing in the saddle. Standing in the saddle is another position for practicing your balance. Anyway also make sure when you are in a jumping position your hips, knees and ankles are not stiff but springy, move with the horse’s motion and absorb the shock of your movement. Hopes those tips help. Cheers!
I just wanted to add one more thing. Your shoulders maybe a little in front of your knees in the jumping position or not. It will depend on your body type and conformation. Some people have longer torsos, shorter torsos, and longer legs, and shorter legs. So how your position lines up will be affected by your body type and you just have to work with the body you have and find the most balanced position for you. The points are just a general guide to help you find your ideal balance in the jumping position.